
 Welcome to the Part two of my Abhushan experiences. This post is basically about the first piece I made after I learnt how to saw brass sheet metal and develop something out of it. To do this I collaborated with a group mate of mine, Mr.Chander Kant Bondwal, a national award winning wood work and ivory carving artist from Haryana. The best part was that we were both new to brass. He had never worked with metal before and I had not worked with sheet metal other than aluminium(for a strange college project) We were both novices but we did find our way through it. Cutting a strip of metal to set a bezel is history. Cold connections and prongs sets are for the present – they are hep and they sure are in. Here is the tutorial for the design
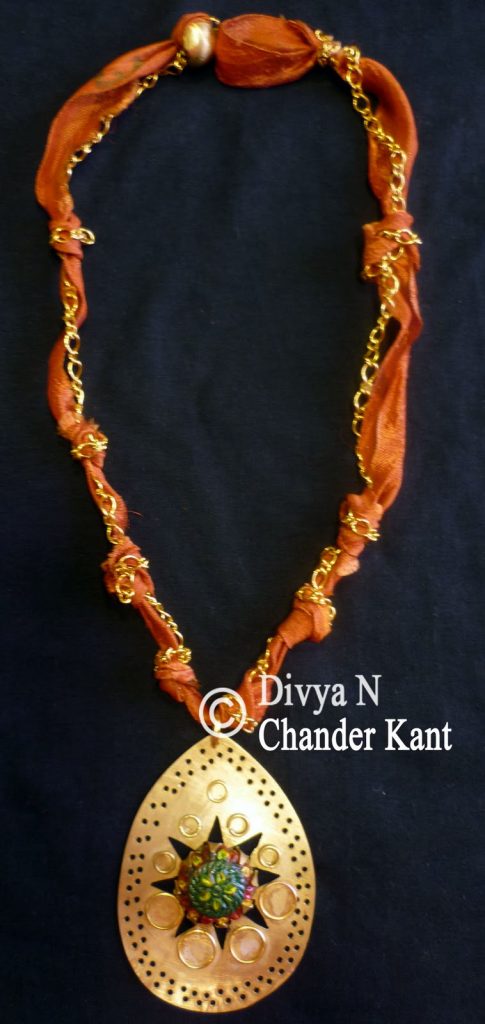
 # Bound Together Necklace
Materials : Brass sheet, Fabric strip, chain, jump rings and focal bead along with other tools (saw, blades, driller, drill bit, grinder, sandpaper and pliers)
Concept: An experiment with bezel setting or Prong setting where we work with the negative space to achieve the positive design
Procedure:
To make the pendant
Step 1 & 2 : Prepare the sheet metal but cutting a piece and flattening it. Sand and draw the required design on it. on a bench with a clamped board, saw through to get the shape. Sand and smooth.
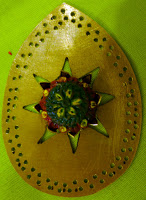
Step 3: Choose a cabochon to be set. Usually people set gemstone, cut stones, pearls, crystals or even glass but since I wanted to make something unique, I decided to set mud. Yes MUD!!. Mud in the form of Teracotta as we had loads of terracotta artists working with us. It took me time to convince my teammate as nobody wants to go through all this work to set mud. But me being me, I was adamant and painted the piece in bright colours and varnished it to get a glaze look.
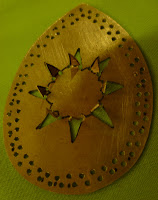
Step 4: Trace the design of the cabochon in the center or wherever you want to set it and draw outward triangular petals as in picture.
 Step 5: Using the driller, drill holes all around to create the design. Also drill at the triangles so that you can put your saw through.
 Step 6: Saw and and smoothen all rough edges. Texturize if required with a grinder.
Step 7: Set the bezel and fold the prongs in gently without damaging the focal. The pendant is done.
Step 8:Add jump rings to the top hole to make a bail. If you make two of these pieces and add hooks they can become earrings.
Making the necklace
Step 1: Twist together a strip of 1″ fabric (singed on both edges) with a long strip of metal (gold) chain. I added 2 lengths of chain to make this piece.
Step 2: String in the pendant and Knot as required at intervals to keep the pendant in palce
Step 3: Clasp: As I didnt want an additional clasp in this piece, I knotted an open compressed gold bead at open end and made a loop for it to pass through on the other end.
Its done!! If you want you can embellish it with a few jump rings like we did.
Please do not copy this design or this technique to make a similar product for sale because now apart from the two of us (collaborating artists) it belongs to the Govt. of India and is to be used for Artisan welfare only.
I hope you all found this technique interesting. In the next post I shall show you how I used a similar technique to come up with a blooming lotus ring.
Cheers

Leave a Reply