
Having read so much about beads in the last post by Keith, I was really tempted to make something beaded and also write a tutorial for it. Since I am really short on time these days, I settled on a pair of simple Chain and bead earrings that you can make in about 5 minutes and it costs almost nothing.
So if you are a non necklace person like me (I only make necklaces, never wear them) then you will appreciate this design as it incorporates the biggest accessory trend of Chain links into it…..So grab some tools and have fun!!
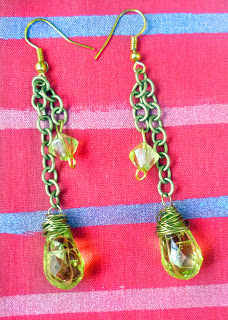
Chain and bead earrings tutorial
Materials required
– 2 sets of beads (I chose a bicone and a crystal drop – they were a part of an old earrings(you can tell from the scratches) which I just reinvented)
– 4″ chain – 2 pieces(I chose an antique brass for I wanted a gold bases earrings) The chain length depends on the length of the earrings and you can make it shorter or longer
– A length of wire to wrap the crystal drop into a brio
– 2 eye pins (small)
– earrings hooks
– nose pliers & flush cutter
Procedure
1) Making a briolette – A briolette is made with a bead or a crystal that has two side by side holes rather than on opposite ends – like crystal drops. To make a brio, first take the wire through both holes and cross them, so that they look like a X mark then proceed to curve the wire in such a way, that the formation looks like the number 8 as in the visual.
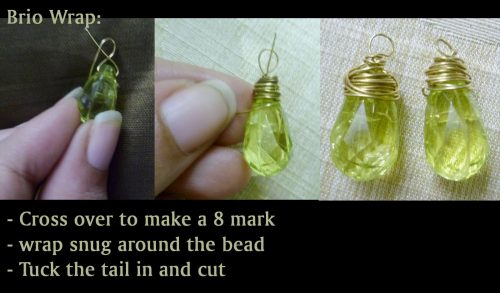
The shorter end of the wire will get tucked in or can be snipped off in the end. Using the longer end go around the bead wrapping it securely. Usually it is done one wrap after the other making it seamless. But here I have wrapped it criss cross for I wanted a very raw look. Repeat the process for the second bead.
Easy way: If you think this is complicated, then just add a jump ring through the holes.
2) Loop the small bicones – I am sorry, the picture I clicked for this step is somehow missing. Insert the bead in the eye pin and bend the extra at right angle to the bead. Then slowly in three strokes, curve it like a flipped ‘C’. Cut an excess and bring the wire into the bead hole to form a loop.

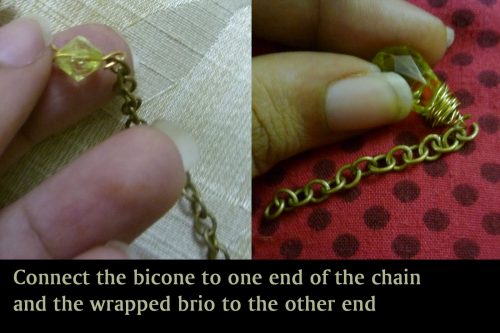
3) Now take one piece of the chain – add the brio to one end and add the bicone to another
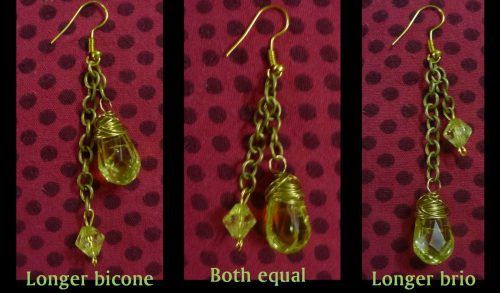
4) When both pairs are done, the next step is to add the ear hooks. Before that you have to decide how you want your earrings to look.. Since it is only a chain you can simply add the ear hook anywhere. I tried three combinations. Longer bicone- shorter brio, Both equal and longer brio and shorter bicone. I modeled it for my mom to see and she picked the longer brio version, so I made that as final.
Thats it! Your Chain and bead earrings are done. Now wasn’t that really simple? I am sure you can add this to one of those – “Make it now – wear it right now”projects
I hope you found the post interesting
Cheers

Leave a Reply