
August marks the beginning of Festive season in India. It brings with it lots of colour, splendor and celebrations. One such upcoming festival that I have written about in the previous years on this blog is Rakshabandhan. Rakshabandhan ( August 7th 2017) celebrates sibling love and the spirit of brotherhood (and sisterhood if you particular about the wording). On this day, sisters tie a string (Rakhi) on their brothers wrists to remind them of this bond and to seek protection. In return, brothers give gifts to their sisters.

Rakshabandhan In the Mid 90’s* (Updated with inputs from my dearmost friends)
The only time, I celebrated Rakshabandhan was in middle school, even then due to peer pressure. Back then the only way a girl could be “just friends” with a guy in her class was to become his Rakhi sister as being a boy’s “girl friend” (both with and without the space between girl and friend) was a big NO. Naturally, girls rounded up every guy they ever wanted to be friends with (maybe even had a crush on – Yup I said it out loud) and tied Rakhis on their wrists in order to get to know them better. Anything that was round – paper, fabric, sequins, thermcol decorations that could be tied with a string became a Rakhi. This was before Friendship day (August 6th in 2017) became a big thing in India where tying of one cord was replaced by another – a Friendship bracelet.
It would be hilarious to watch boys run like headless chicken to avoid becoming Rakhi brothers. Once the Rakhi was tied they had to cough up cash or candy or any other gift the sister wanted. One year, posters of Cricket stars was a popular gift. Some of the girls got their Rakhi brothers to buy them posters of Sachin Tendulker or Sourav Ganguly. Imagine the plight of those boys who had their own biological sisters and cousins. It meant a serious dent in the pocket money collected over a year. *Having read this post a close friend recollected how her then Rakhi brother (Brother from another mother – in her own words) saved up the money he used to get to fill air in his bicycle tires and got her a poster.
Though a few – both girls and guys would take the pact seriously – Renew it every year, some would go even so far to fight with other boys who troubled their sisters, it was just a fad for most of them. A emotion, that was conveniently forgotten when certain other emotions came into play down the years. As a cynical teenager, I never saw any purpose in observing this convention.

Whenever I picture boys running away from a gang of girls who are trying to tie Rakhis, I am reminded of the above scenes from the famous Mustafa Song from Kadhal Desam that came during the same period (Watch at 4.48 seconds) and the girls round up boys at their college and tie up styrafoam garland decorations as Rakhis. I remember a classmate of mine who vowed that he would escape without a single sister one year. Guess what, he ended up like Chinni Jayant in the above picture.
Tying Rakhi to people other than your own siblings and cousins has its merits. All things considered, it was a way to keep flirts and troublesome boys away. It was also a society sanctioned way to friend those kids your parents claimed as a “bad influence.” Claiming them to be your Rakhi siblings hardly left a comeback for the parents in an argument. It was opportunity for an only child to know sibling love and sometimes also led to long standing friendships.
Through I have made Rakhis for other girls in class. Laden with bits of fabric, sequins and embroidery thread, I would churn out Rakhis by the dozen even during class hours. I vaguely remember having made a tiny bit of cash in return for them. Or maybe it was just a couple of diary milk chocolates that were promised to the girls by their rakhi brothers. It would be a lot of work but in the end, I got my money and candy through an honest day’s work that too without running behind anyone.

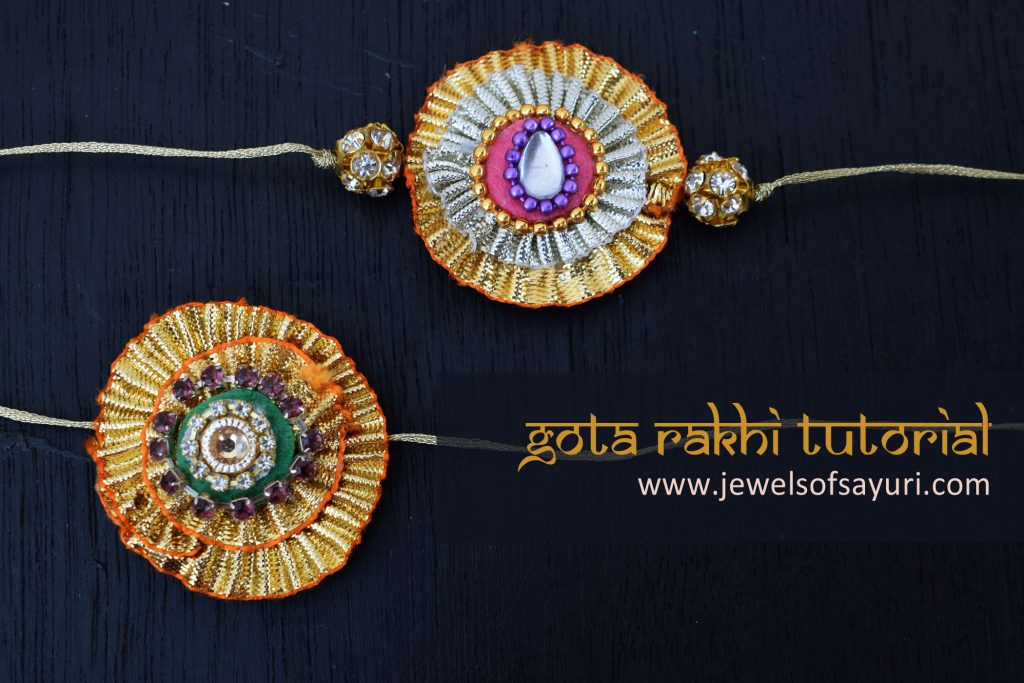
But then if I had Gota flowers and a glue gun with me, it would have been so much easier. I could have made dozens of beautiful Rakhis in no time. So I wrote this tutorial for all the girls out there are looking to make or sell their Rakhis at the last moment.
Make your own Gota Rakhi – DIY Tutorial
This tutorial makes use of Gota appliques to create the Rakhis. If you do not know what Gota is, check out my past posts on Gota and Gota jewelry here. If you do not have access to gota, you could check out this old tutorial of mine of how to make Rakhis out of Fabric yoyos, foam sheet or even beads.
Materials
Gota rounds or Gota phool – 1″ and 1.5″ in gold or silver
Felt
Metallic thread or Embroidery thread
Embellishments – Ball chain, rhinestones, rhinestone chain – as need be
Glue – glue gun and fabric glue
Scissors

Method
- Cut two felt circles – one small about 0.75″ diameter and other 1.25″ diameter
- Stack the Gota rounds on top of each other as per your design and glue them. Add a circle of felt in the center as the base for any embellishments that you might want to add
- Cut a length of cord or thread ( circumference of your wrist plus 6-7″). Apply hot glue to the back of the stacked gota and glue the center of the thread.
- You could twist metallic thread with embroidery thread to create a thicker and colourful cord.
- Cover it with the bigger felt circle by gluing it. This traps the thread in and makes the Gota Rakhi more durable. Let it dry.
- Embellish the top of the Gota Rakhi using rhinestones, ball chain, rhinestone chain – as need be with fabric glue. Choose a clear glue as you’ll need quite a bit to get the stones to adhere well and you do not want the glue showing up once it dries.
- Add beads to the Gota Rakhi if you want by knotting them to the tie up thread.
- Knot each side of the thread approx 1″ from the end and unravel the thread. This will give an impression of a tassel.

Though I narrated my school memories in this post, Gota Rakhis need not be restricted to school kids alone. It can easily be tailored to suit your siblings regardless of their age. I have kept the tutorial fairly basic as the output is only limited by your creativity and the type of embellishments you find or want. While Rhinestones might be suitable for a young adult crowd, 3D stickers of comic characters or cars might be suitable for Primary – middle school boys. Symbols like anchor sand gears are not out of question for high schoolers. Older men might prefer traditional embellishments like AUM, Swastik, kalash or even symbols of Deities. You can make Rakhis for girls too and even adapt it to make Friendship bracelet if you want by using smaller circles.
I hope you had fun reading about my Rakshabandhan memories. There a few more stories in stock that I will share next year. Meanwhile, I hope you will enjoy making your Gota Rakhi. Do tell me in the comments what you think of the tutorial. Also please share, any memories you have of Rakshabandhan.
I intended this to be a funny light hearted post based on my experience and did not mean any disrespect to anybody’s feelings or customs. I deeply respect and acknowledge the true intentions behind the celebration and wish you a all a Shubh Rakshabandan.
PS: For People living outside India (and her neighbouring countries), Gota is available in plenty on Etsy. Fair warning though it is atleast 3- 5 times more expensive than its actual price.
I hope you found it interesting
Cheers

Save
12 responses to “Make your own Gota Rakhi – DIY Tutorial”
It’s a fascinating tradition – amusing but also teaches kids certain values. Being a jewelry designer, you can add a lot of elements that other people have no idea where to find and how to use them 🙂
It is actually a sombre festival but as kids it was fun and a fad. Back Then we were not concerned by the ideologies of it
I am sure you had a great time in the festival. Your jewelry is always fabulous! Kisses, my friend.
Thanks Mia, yes it is quite a fun filled festival
I know about this lovely and for some of the boys – financial depression bringing tradition and loved reading your reminiscence of it. Thank you for the super easy tutorial!
I enjoyed writing about it
This is fascinating! Thanks for describing this interesting tradition from your culture. And, you also present a detailed tutorial for anyone who wants to make their own rakhi. Great post!
Carol (“Mimi”) from Home with Mimi
I am glad that you enjoyed it Mimi
Hello,
I love your tutorial. Your rakhi making tutorial is realy very helpful. Thank you for sharing this tutorial. Keep sharing new ideas with us.
I am glad that you find it useful
I enjoyed reading this blog as I didn’t know about Gota Rakhi and it looks very beautiful. Very informative and useful. Will definitely try it!
Thanks for sharing such a nice post… “Gota rakhi diy” as shown a easy of way making rakhi. The Gota rakhi diy is looking very beautiful. I would love to make this diy.