
This faux Multani Necklace started with my quest to find jewelry from Multan – a northwestern Punjab province, in today’s Pakistan. No, I was not looking to buy. Rather, I was looking to create a piece inspired by traditional Multani jewelry. At that point in time (in the beginning of May 2016) I did not even know, if such a thing/style existed. A quick Google search lead me to fabulous enamelled necklaces in stunning blues. I learnt that these blue pieces were created to symbolise the blues of Lapis Lazuli stones.
Multan & Sindh
The city of Multan finds mention in several ancient Hindu texts. It is said that the word “Multan” was derived from the word “Mulasthana” meaning central point or location. I am unsure of the authenticity of this information as in today’s context Mulasthana refers to the Sanctum Sanctorum of a Temple. Multan and Sindh came under Islamic rule under Muhammad bin Qasim in 712 AD. This gave rise to intermingling of Islamic and Vedic aesthetics in the subsequent years. The blue pottery of Multan – Kashikaari is quite famous as well.


Blue Multan Jewelry
I found several examples of the gorgeous Multani haar online. In stunning blue enamel with accents of green on a silver base they were quite captivating. While rectangle, trapezoid and teardrop seemed to be the common shapes, I found odd ones in diamond and semi circular shapes as well. Two of the most stunning pieces that I found were from the VCM (Virtual Collection of Asian Masterpieces Museum) website and Oppi Untracht’s book Traditional Jewelry of India. While the former mentions that the piece is Islamic – from Pakistan and has Cloisonne enamelling, the latter is from India. To add to my confusion, a craft documentation from this region mentioned the technique as “Pardaas”. Pardaas means engraving, typically floral forms in silver. Thankfully, I came across a conversation on Ethnic Jewels Community which clarified some of my doubts.
A member had a Multan style necklace with the image of Goddess Durga on the pendant. In the due course of the discussion, I came to know that this style of jewelry making was common to Multan and Sindh. The British occupation of Sindh (along with India) and the subsequent migration of Hindu Sindhis to India, seems to have brought the craft here. Both cloisonne and Champlevé enamelling techniques are used to create this style of jewelry.
Chandrahaar
The Chadrahaar or Chadraseni haar is a semicircular necklace that looks like a crescent moon. While Untracht’s book refers to the long Multani necklace as Chandrasenihaar, it seems to called as “Queen Victoria Necklace”, locally in Kinnaur. Why so, I have no idea.

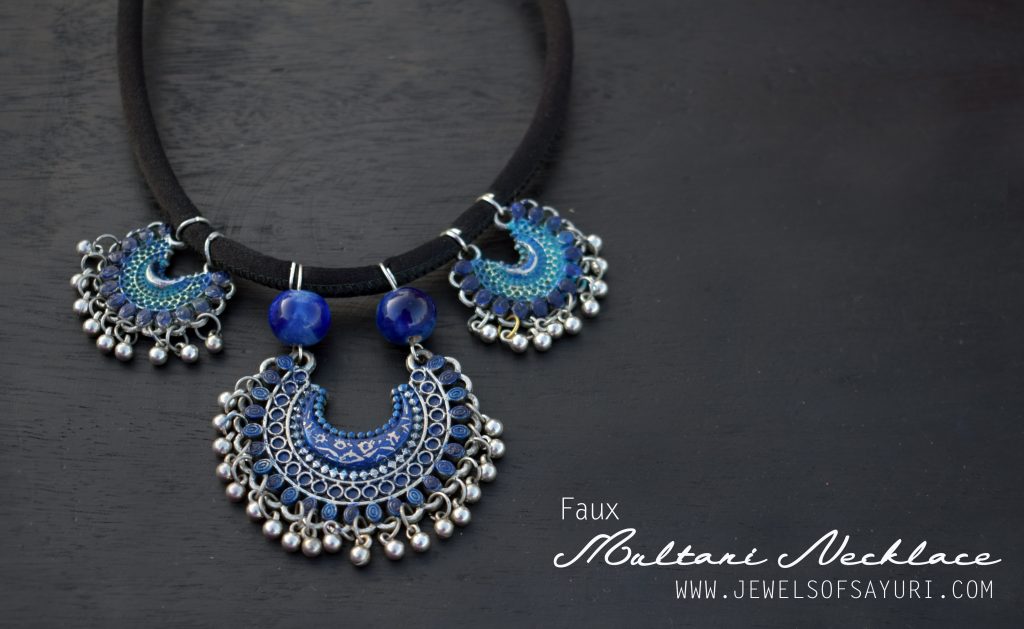
Faux Multani Necklace
I analysed all of the above points of reference as inspiration for my necklace and narrowed on a few. I chose to include
- The colour blue with hints of green
- Shape & Form – Crescent – for the Chandra in the Chandrahaar
- Materials – ceramic beads (Blue pottery of Multan), Silver tone dangles
- Motifs -floral
- Technique – Faux Cloisonne and faux champleve coloring, distressing for an ancient look
I decided to use Afghani Jewelry components left over from the DIY Ethnic Cork Necklace . They were in Chandbali shape, had marked spaces for colour filling and had a distressed silver look.* In lieu of using layers of chain, I decided to use a thick silk cord in black as a ode to the Peroyee (stringing) done in the VAS necklace. Instead of following the Champlevé technique, I used the Sgraffito and distressing (relief) Technique as I wanted this design to be an easy to follow DIY. Sgraffito consists of creating a preliminary surface, covering it with another, and then scratching the superficial layer in such a way that the pattern or shape that emerges is of the lower colour.

DIY Faux Multani Necklace with silk cord
Materials
- Afghan jewelry components Distressed – 1 main focal (about 2.5″) and 2 other small focals(1.5″) *
- Distressed Silver tone Jump rings
- Distressed Silver tone dangles – ghungroos
- Patina ink Sapphire
- Patina ink Verdigris
- Vintage Patina sealer or Renaissance Wax
- Relief block or scrubber
- Thick needle or engraver tool
- Paintbrush, cotton cloth
- Ceramic blue round beads – 2
- Artistic silver wire – 20g
- Silver tone Conical bead caps – 2
- Silk cord – 20″ (depending on the desired length)
- Silver tone clasp
- Liquid fusion glue
- Jewelry Tools – chain Nose pliers, Round nose or step pliers, wire cutter
*I have also seen sellers selling components with a similar finish on Facebook, flea markets in other countries and at Beadfest as well.
Distressing metal – Method
If your components have a shiny silver finish, rub them gently with a vessel scrubber till the shine wears off. Dust, wash and dry. They must be completely sealed after the full necklace is made.
In this tutorial I am going to show how to do the main focal in detail. The side focals are made in similar (but without the sgraffito technique) and hence will be mentioned only in the passing. If you have any doubts, please ask your questions in the comments. Let us proceed with the method now.

Method
- Using pliers attach the ghungroos to the focals using jump rings. You can choose to put your dangles in all or some of the holes. Distress if required. Clean to remove all traces of oil and dirt and dry.
- Apply Sapphire Patina ink without extender and let dry.
- Using a relief block or scrubber remove most of the ink.
- Repeat steps 2 & 3 (3 times atleast) until you are happy with the colour. The cavities must be filled with the colour and It should have an aged look now.

5. Apply a thick layer of blue on the area that you want to scratch and let dry.
6. Using an mechanical engraver tool or a blunt needle, slowly scratch designs. Mine has flowers on stems, leaves and triangles as in the inspiration images.

7. Apply Sapphire Patina ink to the lower and upper portions of the small focals and verdigris ink in the center using a paint brush. Let it dry.
8. Using a relief block or scrubber to scrub and add inks until you are happy with how it looks. My side focals look more grungy compared to the center, for I did them a month apart. Talk about UFOs!
9. Seal the front and back of the components using patina sealer or Renaissance wax.

Method – Assemble the necklace
10. Cut the desired length of Black silk cord.
11. Insert an eyepin in a conical bead cap. Apply glue on the inside (I recommend using 2 part epoxy resin to glue if available for a stronger bond). glue the caps to the ends of the cord. Let it dry until the bond is strong.
12. Using artistic silver (or gunmetal) wire loop ceramic beads to the center focal. Wrap twice around the cord and tuck.
13. Connect the smaller focals to the silk cord as well. Form wraps with bail or step pliers or use jumprings.
14. Add a clasp using jump rings to the Multani necklace.

With that we come to the end of the longest tutorial post that I have ever written. I have tried to simplify the process as much as possible without compromising the look of the finished piece. As always comments, feedback and questions are quite welcome. I will try my best to reply.
This necklace is mine and not for sale! I recently wore the necklace at a work meet, where another colleague wore the unaltered (original) Flee market necklace. Infact I chased after her to show it to her and being an accessory designer as well, she paid me (my necklace) compliments.
PS: My blog is acting a crazy so I have changed the template. If you have any trouble viewing and commenting particularly from your phones, or if you find whole areas missings, please inform me.

I hope you found it interesting
Cheers

12 responses to “DIY Faux Multani Necklace with silk cord”
Beautiful article…..its very informative thanks!!
Thank you
A true statement piece, Divya! The explanation of the distressing process is valuable. Ink metal patinas are quite expensive here as they are imported but they are on my to buy list.
Yes, the inks are a little on the expensive side if you add the import duties and taxes but a little goes a long way. I have had these bottles for almost 5 years now. They are great supplies to have
Beautiful Necklace and great tutorial. Upon first sight I thought that the focal was made up of several different components.
Didn’t even suspect that it was painted and distressed. Wonderful work!!
It would look fabulous with many different components but it would require advanced skill from the maker. I like doing tutorials that are easy. I hope you enjoyed it
Wow – your necklace is really beautiful! Also, I totally understand how difficult it can be to write a tutorial that shows all the necessary steps without being the length of a novel. It’s a struggle!
Thank you Natasha. It does take a long time to research, conceptualise and write tutorials
Beautiful necklace Divya! Thank you so much for sharing the extensive tutorial!
Thanka Maya. I am glad that you enjoyed it
Very interesting, especially since I originally come from a city which was on the other side of the Indus river from Multan; a city which often ended up getting clubbed with Multan. I don’t think anybody in my family is aware of these gorgeous pieces or this incredible style. Thank you for writing this. 🙂
Thank is so cool. If you know of any more historical references please do share.